
 |
| Example clip and companion video available on this link |
Enter Gunther Wagner’s incredible piece of software called LRTimelapse. The software is designed to work in conjunction with Adobe Lightroom or Bridge, but as the name suggests, it works best with Lightroom (and is compatible all the way from LR4 through to CC/6). At first I avoided the software as it is not cheap, but soon relented and my time-lapse clips improved as a result.
The basic stipulation is that the camera be set to RAW capture and manual mode. As the timelapse progresses you need to take a look at the exposure (setting your camera to image review mode is a good idea in this regard so that you can keep an eye on the histogram). It is possible to shoot in Aperture Priority but the cleanest results tend to be when the original footage was short in manual. Essentially, what you are trying to get rid of in your final footage is something called ‘flickering’. This is when individual frames are exposed differently and create a flickering effect in the final video. Now, using the develop section in Lightroom allows us to correct individual frames so that even if the actual exposure between two frames is different, they can be made to look identical with clever use of the development sliders.
A quick note on the Companion Video on Vimeo. The sequence was shot when I started playing with the CamRanger and MP-360 robotic head for timelapse. The sequence was shot on a Nikon D3x with a 20mm f2.8 attached. A Lee 0.6 Soft Graduated Filter was also a part of the setup. The whole clip took just over an hour to shoot and produced 1141 frames. The original sequence came to just over 30 seconds in length at 30fps. I chose to speed the film up in Premiere Pro to smooth out some of the jiggle in the pan caused by gusting strong winds (I was standing on the exposed roof of a high-rise office block).
LRTimelapse allows you to identify individual ‘keyframes’. You can then edit these keyframes in Lightroom and LRTimelapse will automatically correct all the other non-keyframes so that any changes in exposure occur on a curve rather than as a flickering effect. The complication is getting the workflow right. As phenomenal as LRTimelapse is, it’s fairly easy to make a mistake working between it and Lightroom. Added to this is that there are several video tutorials, but very few written tutorials. Below is my answer to this: a step by step workflow to creating a timelapse with LRTimelapse 3 (I have yet to upgrade to 4 but it apparently works in exactly the same way).
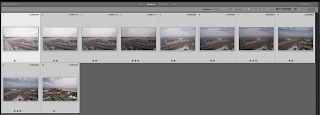
Step 1 - Ingest all your images into Lightroom.

Step 2 - Open up LRTimelapse and navigate to the folder where your ingested RAW files are. When you click on the folder the image files will start to populate in the right hand panel. Above this panel is a button with a star called 'Initialize' (see image above). Click this to get your files ready for processing in Lightroom. The preview screen will show a straight yellow line representing your RAW exposure and a blue wavy line representing the tonal value in the scene (see image below).

Step 3 - Click the Keyframes Wizard for LRTimelapse to work out which images represent where there have been exposure changes. You can also add additional Keyframes where you feel you might want to add adjustments in the clip. You can watch a preview by clicking on the play button under the preview screen. Finally, after the automatic keyframes have been added along with any that you want, click the Save button. Once the changes have been saved (LRTimelapse is actually changing the .xmp file that is attached to each individual image) move across to Lightroom.
Step 5 - In Lightroom select all of the clip’s images (Cmd+A/Cntrl+A) and go to Metadata>Read Metadata From Files. A pop up window appears to confirm - click Read.

Step 6 - Once the task bar is finished and the new metadata has been read, use the Library Filter or Quick Filter to select only the LRTimelapse keyframes. This only shows the images that you and LRTimelapse chose as keyframes to be processed. One star = keyframe, Two stars = end of exposure sequence (i.e. the last frame before there is a jump in exposure), Three stars = beginning of exposure sequence (i.e. first frame after a jump in exposure). The idea is to put your basic adjustments into the One Star keyframes and to make your adjacent Two and Three star images as identical to each other in exposure as possible.
Step 7 - Adjust your first keyframe to your liking and copy the changes (Shift+Cmd+C/Shift+Cntrl+C). Go to the next keyframe and paste in the settings (Shift+Cmd+V/Shift+Cntrl+V). You can alter the settings slightly if you like if you feel there needs to be a shift. Usually the idea is to make the frame look similar to the first frame. Save the changes and shift to the next frame. If the next frame is a Three Star following a Two Star, try and make the changes so that the two images look as identical as possible. Continue on in the same manner until you have finished adjusting all of the keyframes.
Step 8 - Save the metadata to the files by selecting all the images you have worked on (Cmd+A) and then hitting Cmd+S/Cntrl+S. Now move across to LRTimelapse and hit the Reload button. The yellow line on the preview image will grow some spikes to indicate where the changes were made.
Step 9 - Click Auto-Transition and LRTimelapse will automatically alter all the non-keyframe files so that they seamlessly fit with your keyframes. In theory you could move on to finish here, but I occasionally use the Deflicker control.

Step 10 - Switch from Basic Workflow in LRTimeplapse to Deflicker Workflow. A new button pops out (see image above). First go to your preview panel and draw a box (pink rectangle in the image below) with your mouse on the area you don’t want to have flicker (usually a piece of the sky). LRTimelapse uses this as it’s source area for altering the files. Next click on the Deflicker button. A sliding panel pops out and a red line goes over your adjusted yellow line on the preview panel. You can smooth out little jumps in exposure by sliding the toggle to the right on the Deflicker control (the red line will smooth out to illustrate this). Finally, hit Save again.

Step 11 - Head back over to Lightroom. Make sure that you can see all the images (LRT Full Sequence in the Library filter or just click Library Filter: None). Select all the images and go to Metadata>Read Metadata From Files. Once this has happened you have files that are ready to export into jpegs. Before you do this you might want to do any dust-spotting. LRTimelapse doesn’t do this automatically so you have to do it at the end, so…
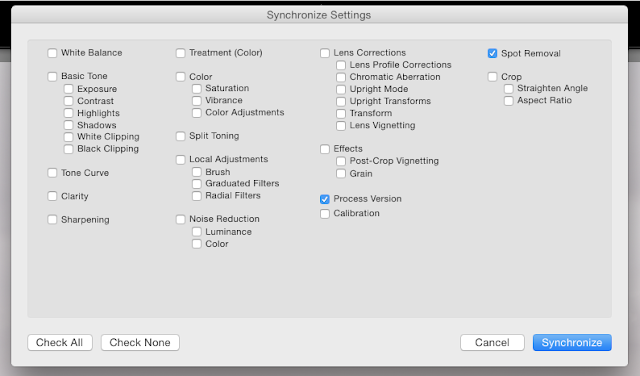
Step 12 - Go through the usual healing brush workflow to find your dust spots and erase them. Very importantly, you ABSOLUTELY HAVE TO manually shift the source points for each of the healing spots. Even if Lightroom gets it right you still have to shift the source point slightly. This is so that you can sync the healing spots across all your images. Once you have cleaned your image, select all the other images and hit the synchronise button. Make sure that when you synchronize you only synchronize the healing brush and the process version (all other boxes must be un-ticked - see below).
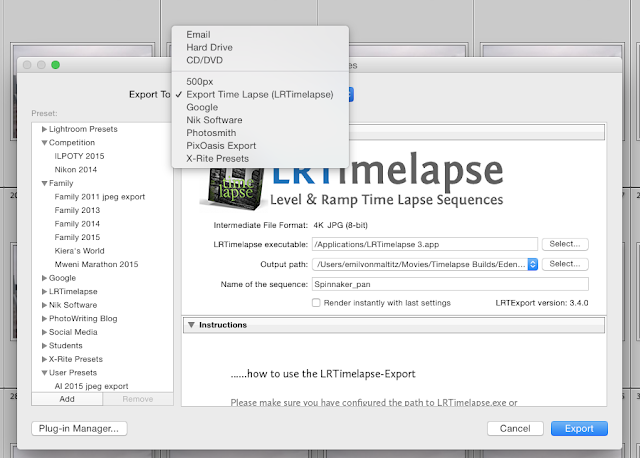
Step 13 - Select all the files again and export from Lightroom. When the export dialogue pops up select the export to: Export timelapse (LRTimelapse) option. Choose the folder you want it to go to and press export. Lightroom now creates a creates a series of jpegs, sized to 4K video resolution, that can be put together as a video clip. If you want 6K resoluion you need to select this in the preset menu under LRTimelapse.
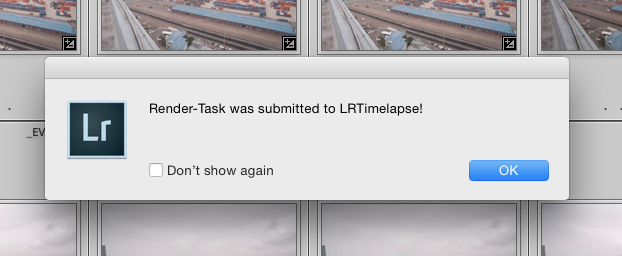
Step 14 - Once all the files are ready (have been rendered into jpegs), a window automatically pops up again and asks whether you want to render the video via LRTimelapse. You can go back into LRTimelapse and choose the settings you would like before hitting the button marked Render Video. That’s it, you now have a timelapse clip (You can also skip this step and import the jpeg files directly into a video editor as a sequence).

Step 15 - Finishing Off. At this point you can import the video clip into a editor like Premiere Pro or Final Cut Pro and splice it together with other video to put together a narrative story of clips.
In my experience LRTimelapse is the easiest way to get excellent quality timelapse footage out of a stills camera. It's available for download from this link. It is expensive and there are alternatives out there, but quite frankly LRTimelapse seems to work more simply and effectively than the others that I have tried. Doubtless I'll eventually upgrade to version 4, but version which I am still on is absolutely adequate for what I use it for. You can try the software for free for as long as long as you like for HD videos. The only real 'gotcha is that your sequences can't be longer than 400 frames in length. Still this is a good way to get to grips with the software and decide whether you want to fork out for it.
A quick note on the Companion Video on Vimeo. The sequence was shot when I started playing with the CamRanger and MP-360 robotic head for timelapse. The sequence was shot on a Nikon D3x with a 20mm f2.8 attached. A Lee 0.6 Soft Graduated Filter was also a part of the setup. The whole clip took just over an hour to shoot and produced 1141 frames. The original sequence came to just over 30 seconds in length at 30fps. I chose to speed the film up in Premiere Pro to smooth out some of the jiggle in the pan caused by gusting strong winds (I was standing on the exposed roof of a high-rise office block).
LRTimelapse allows you to identify individual ‘keyframes’. You can then edit these keyframes in Lightroom and LRTimelapse will automatically correct all the other non-keyframes so that any changes in exposure occur on a curve rather than as a flickering effect. The complication is getting the workflow right. As phenomenal as LRTimelapse is, it’s fairly easy to make a mistake working between it and Lightroom. Added to this is that there are several video tutorials, but very few written tutorials. Below is my answer to this: a step by step workflow to creating a timelapse with LRTimelapse 3 (I have yet to upgrade to 4 but it apparently works in exactly the same way).
Step 1 - Ingest all your images into Lightroom.
Step 2 - Open up LRTimelapse and navigate to the folder where your ingested RAW files are. When you click on the folder the image files will start to populate in the right hand panel. Above this panel is a button with a star called 'Initialize' (see image above). Click this to get your files ready for processing in Lightroom. The preview screen will show a straight yellow line representing your RAW exposure and a blue wavy line representing the tonal value in the scene (see image below).
Step 3 - Click the Keyframes Wizard for LRTimelapse to work out which images represent where there have been exposure changes. You can also add additional Keyframes where you feel you might want to add adjustments in the clip. You can watch a preview by clicking on the play button under the preview screen. Finally, after the automatic keyframes have been added along with any that you want, click the Save button. Once the changes have been saved (LRTimelapse is actually changing the .xmp file that is attached to each individual image) move across to Lightroom.
Step 5 - In Lightroom select all of the clip’s images (Cmd+A/Cntrl+A) and go to Metadata>Read Metadata From Files. A pop up window appears to confirm - click Read.
Step 6 - Once the task bar is finished and the new metadata has been read, use the Library Filter or Quick Filter to select only the LRTimelapse keyframes. This only shows the images that you and LRTimelapse chose as keyframes to be processed. One star = keyframe, Two stars = end of exposure sequence (i.e. the last frame before there is a jump in exposure), Three stars = beginning of exposure sequence (i.e. first frame after a jump in exposure). The idea is to put your basic adjustments into the One Star keyframes and to make your adjacent Two and Three star images as identical to each other in exposure as possible.

Step 7 - Adjust your first keyframe to your liking and copy the changes (Shift+Cmd+C/Shift+Cntrl+C). Go to the next keyframe and paste in the settings (Shift+Cmd+V/Shift+Cntrl+V). You can alter the settings slightly if you like if you feel there needs to be a shift. Usually the idea is to make the frame look similar to the first frame. Save the changes and shift to the next frame. If the next frame is a Three Star following a Two Star, try and make the changes so that the two images look as identical as possible. Continue on in the same manner until you have finished adjusting all of the keyframes.
Step 8 - Save the metadata to the files by selecting all the images you have worked on (Cmd+A) and then hitting Cmd+S/Cntrl+S. Now move across to LRTimelapse and hit the Reload button. The yellow line on the preview image will grow some spikes to indicate where the changes were made.
Step 9 - Click Auto-Transition and LRTimelapse will automatically alter all the non-keyframe files so that they seamlessly fit with your keyframes. In theory you could move on to finish here, but I occasionally use the Deflicker control.
Step 10 - Switch from Basic Workflow in LRTimeplapse to Deflicker Workflow. A new button pops out (see image above). First go to your preview panel and draw a box (pink rectangle in the image below) with your mouse on the area you don’t want to have flicker (usually a piece of the sky). LRTimelapse uses this as it’s source area for altering the files. Next click on the Deflicker button. A sliding panel pops out and a red line goes over your adjusted yellow line on the preview panel. You can smooth out little jumps in exposure by sliding the toggle to the right on the Deflicker control (the red line will smooth out to illustrate this). Finally, hit Save again.
Step 11 - Head back over to Lightroom. Make sure that you can see all the images (LRT Full Sequence in the Library filter or just click Library Filter: None). Select all the images and go to Metadata>Read Metadata From Files. Once this has happened you have files that are ready to export into jpegs. Before you do this you might want to do any dust-spotting. LRTimelapse doesn’t do this automatically so you have to do it at the end, so…
Step 12 - Go through the usual healing brush workflow to find your dust spots and erase them. Very importantly, you ABSOLUTELY HAVE TO manually shift the source points for each of the healing spots. Even if Lightroom gets it right you still have to shift the source point slightly. This is so that you can sync the healing spots across all your images. Once you have cleaned your image, select all the other images and hit the synchronise button. Make sure that when you synchronize you only synchronize the healing brush and the process version (all other boxes must be un-ticked - see below).

Step 13 - Select all the files again and export from Lightroom. When the export dialogue pops up select the export to: Export timelapse (LRTimelapse) option. Choose the folder you want it to go to and press export. Lightroom now creates a creates a series of jpegs, sized to 4K video resolution, that can be put together as a video clip. If you want 6K resoluion you need to select this in the preset menu under LRTimelapse.

Step 14 - Once all the files are ready (have been rendered into jpegs), a window automatically pops up again and asks whether you want to render the video via LRTimelapse. You can go back into LRTimelapse and choose the settings you would like before hitting the button marked Render Video. That’s it, you now have a timelapse clip (You can also skip this step and import the jpeg files directly into a video editor as a sequence).

Step 15 - Finishing Off. At this point you can import the video clip into a editor like Premiere Pro or Final Cut Pro and splice it together with other video to put together a narrative story of clips.
In my experience LRTimelapse is the easiest way to get excellent quality timelapse footage out of a stills camera. It's available for download from this link. It is expensive and there are alternatives out there, but quite frankly LRTimelapse seems to work more simply and effectively than the others that I have tried. Doubtless I'll eventually upgrade to version 4, but version which I am still on is absolutely adequate for what I use it for. You can try the software for free for as long as long as you like for HD videos. The only real 'gotcha is that your sequences can't be longer than 400 frames in length. Still this is a good way to get to grips with the software and decide whether you want to fork out for it.
No comments:
Post a Comment