

Over and above everything else that Adobe’s Lightroom offers the photographer, convenience is the key attribute that brings people back to Lightroom again and again. In an age of social media, this convenience is once more evident in the way that Adobe allows integration between Lightroom and Facebook. The tutorial below offers a step-by-step guide to setting up Facebook as a publish service in Lightroom’s Library module
Step 2: In Lightroom’s Library module head down to the Publish Services at the bottom of the left hand panel and click on the setup button next to the Facebook tab (Lightoom includes this plugin tab as default which is useful). When you click on this a window appears on your screen with the various settings to get Lightroom and Facebook to talk to each other.
First off, give the Publish Service a description. The easiest would be to call it Timeline Photos if you want to basically post images on your timeline rather than to a particular gallery or page. So for this example I will do just that.

Step 3: This is the bit that is the most important. You need to authorize Lightroom on Facebook. Click on the authorize button and Lightroom attempts to connect to Facebook on the internet. You obviously need to be connected to the internet for this to work. Theoretically this should automatically open up Facebook and give you a message to say that Lightroom wants to connect to Facebook (see the image below). Click 'Continue' and then wait. This is where slow internet connections can be a nightmare. I had to try several times to get Facebook and Lightroom to talk nicely to each other. When things don’t seem to be working exit Lightroom entirely (Cmd+Q/Cntrl+Q) and restart the programme and the process.


Finally you will get a message saying that Lightroom is now authorized on Facebook (as above, although Facebook remembered that I had done this before). You can now head back to Lightroom and you will see that in the setup window it now shows that you are authorized as ‘your name’. The rest of the settings are now very similar to the standard export settings for Lightroom:
Step 4: Set the title for the image to be picked up by the IPTC Title. This means that when you type in information into the IPTC title in the metadata settings of the image, this will come up on Facebook. Under File Settings, File Type is locked to jpeg, but you can change the quality of the jpeg file. I personally use a relatively high quality setting of between 80 and 85.

The image resizing menu is also quite important. Images are constantly stolen off of Facebook and people’s personal profiles so you don’t want the image to be too large that it can be used by someone else for anything other than a reposting (it will happen), so resizing to a good web viewable size is important. With new high-resolution devices this should mean a long side edge of no larger than 960 pixels. I personally tend to use a long side of 900 pixels which is the same size that I use for Photo Writing.
Also important is that you add a watermark to your images. You can do this by following the basic instructions on how to set up a watermark in Lightroom on this page.
Also important is that you add a watermark to your images. You can do this by following the basic instructions on how to set up a watermark in Lightroom on this page.
 |
| The settings that can be used to set up the dialogue between Lightroom and Facebook. |
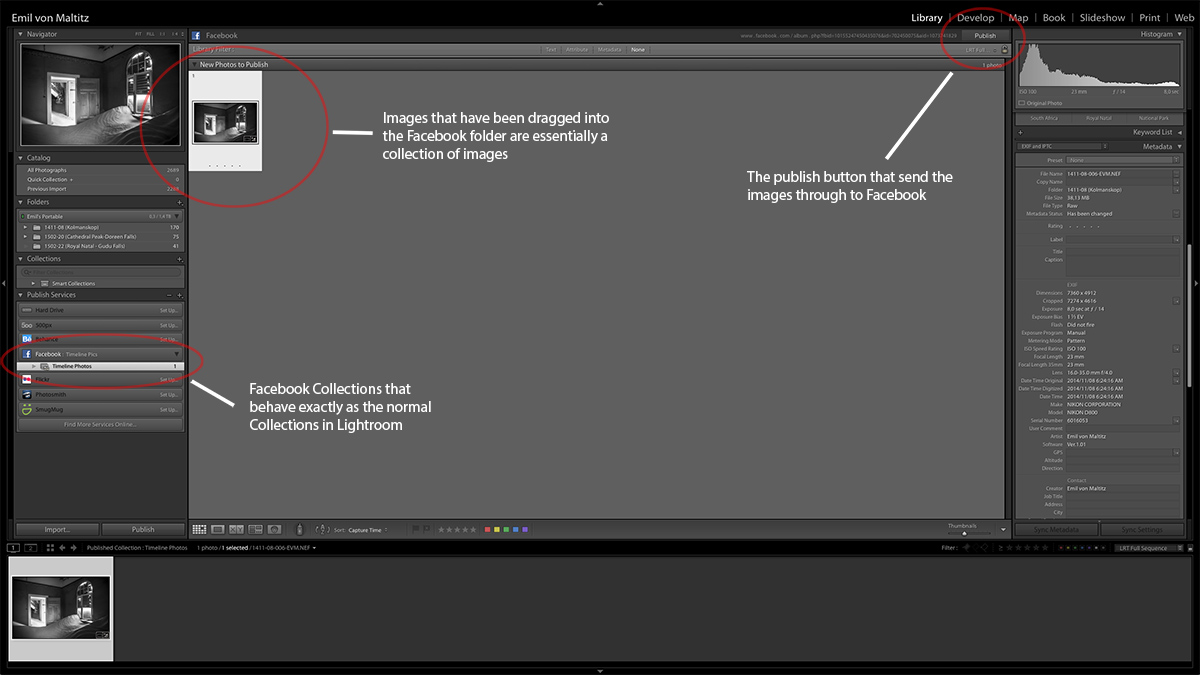
Once you click Save, the setup text disappears and the Facebook panel will now display the description you gave the Facebook Publish Service. To post an image all you have to do is drag an image in Lightroom onto the gallery icon in the Facebook Publish folder. Once here I make sure that my image has a full set of metadata including my copyright information and the text I want to be visible once on Facebook. Once you are ready,click on the publish button on the top right of the 'stage' (the area where the images are shown in Lightroom) and magic happens and the image miraculously appears on Facebook in your timeline.
 What’s really cool though is that Lightroom will download all comments and likes that Facebook garners. At the bottom of the metadata panel in the Library mode is a Comments Tab. On the left of the Comments Tab is a refresh button. Click this and Lightroom connects to your Facebook profile and downloads comments and likes and saves the information next to your image. You can even add a comment and have it upload directly from Lightroom.
No comments:
Post a Comment