
 In the final quarter of last year I found myself working on a very exciting project – my first book. I was commissioned by Standard Bank to photograph an old industrial site adjacent to the Standard Bank headquarters in downtown Johannesburg. This property was purchased by the bank a few years ago for future development. As the buildings on the site were older than 60 years, the site required an historical assessment to take place. The recommendations that were made by the commission before any demolition or development take place, was that the building be properly documented. Standard Bank decided to take the recommendations a step further and produce a high quality large format glossy coffee table book to commemorate the old site. This is where I entered the picture.
 I have been involved in book projects before, but only as a very small entity, providing necessary images, but never actually being more involved. This time round I was completely immersed in the process, also being required to write the accompanying text. I’m not an historian, so the research was completed by the very capable historians, Liz Delmont and Sue Krige. I then spent 10 days in Johannesburg getting to know the site intimately while photographing it from as many angles as possible.

What surprised me at the time was the level of security around the site. Standard, and the other banks in the area have turned this portion of down town Johannesburg into a safe haven. Walking around with upwards of thousands of rands worth of equipment dangling from my neck and shoulders, not once did I truly fear for my safety. On the occasions that I knew I would be peering intently through the viewfinder the remaining staff on the site were good enough to follow me and keep an eye out while I played with exposures.
Two series of images were particularly important one was a stitched panoramic of each street facade, while the other was images taken from the roof of the Standard Bank head office. The former was an interesting exercise in frustration. The shots themselves were fairly straight forward – as many straight on shots of the facades as possible while moving down the length of the street. The concept is simple enough. Plug them into Photoshop and stitch together to form a long skinny panoramic. The problem lies in the fact that the camera platform, i.e. me, is constantly moving down the length of the street. This means that perspective gets thrown out completely. It’s easy enough if the facades are all on one plane, but as soon as there is depth as well, all perspectival hell breaks loose. Judicious ‘art work’ was called for and ultimately I was able to create something of the feel for each of the facades. In retrospect I should have shot them all in the middle of the day though. The problem with trying to get good lighting was that building shadows got in the way. Ah well hind sight is always 20/20.


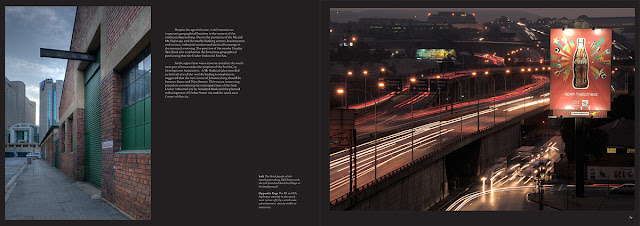
The latter series of images were definitely more fun. These entailed organising access to the roof of each of the Standard Bank buildings. A number of flaming hoops had to be jumped through before I was given the all clear to the roof, under supervision of course. This meant planning well in advance to have a security guard accompany me to the roof. The luckless fellows actually enjoyed themselves in the end. It was something of a break hanging out on the roof doing nothing but catching the breeze while I leaned out over railings praying that I wouldn’t drop a lens and brain a pedestrian 25 storeys below. From the vantage point certain aspects of the city are actually quite attractive.
Keeping the client happy and in the loop and organising shoot and printing logistics were by far the hardest parts of this job. This includes the time spent after the shoot itself. In fact, more work was spent on the project after the shoot than during. The photography was the easiest part of the job by a long stretch. More on that in a moment though. Managing time became paramount during my stay in Joburg. Shooting large RAW files of dark warehouses meant that I would be busy doing a lot of Photoshop work creating HDR images. The problem was that the client also needed to see a large portion of images before the end of the shoot. Obviously, time is money (a book is an expensive project and Standard Bank were concerned about mounting costs – therefore less time shooting), so I found myself desperately trying to get high quality images out at the same time as shooting (primary shoot times were from 5am to 10am and again from 3pm to 6pm). Needless to say I didn’t get much sleep in the days that I was in Johannesburg.
 The hard work started on my return to Durban. Going through the various source materials I started to put together the text (many revisions were in store for me) and work on the basic layout of the book. The advantage of working on one’s own book is that all creative decisions are left to the author. A commissioned book on the other hand requires sign-off by the client. Here I must praise the patience of the coordinator of the project, Marty Jasper, as sign-off for a large client like Standard Bank doesn’t come from any one individual. It is a consensus decision by a group of very powerful overseers who are extremely difficult to pin down in one place at the same time. Marty performed miracles in getting feedback to me so that the project could continue toward some semblance of a deadline (we ultimately missed this partly due to the feedback gap).
For anyone wanting to get into a book project learn how to use Adobe InDesign. Belligerently I attempted to do layout in Microsoft’s Publisher software. Big mistake. All it meant was more late night s as I desperately learned how to use InDesign and re-lay the entire book in a different programme. A number of technical glitches in the print stage kept cropping up. Needless to say these were a result of my neophyte status as layout artist. For any future reference here is a checklist for writers:
- Make sure that the project is done in InDesign and create a separate document for every page
- At the very start make absolutely sure of the page size that is going to be used. Changing it by as much as a millimetre will ruin your day!
- Verify with the printer what the bleed is going to be and set it within your document parameters (this is the extra bit that gets printed at the edge of the page)
- Place crop marks on the final page proofs. The printer requires these to guide their page cutting. Setting it to the bleed is easy enough, but make sure that the printer is happy with this.
· THIS IS IMPORTANT!!! Output the images that you will be placing into InDesign as CMYK colour space (More on this in a moment). Make sure that all black text is set to 100% black and that white is knockout (printing obviously lays down ink, and therefore has a different set of rules as to how colour is created to that of the cameras we use which reproduce colour via light rather than ink).

The biggest headaches revolved around colour space. The amount of time I spent running back and forth between the printers and the office to correct colour proofs was ridiculous. For some obscure reason InDesign and Photoshop don’t always communicate very well. A lesson I learnt very quickly was to check output profiles after saving as one in three were often incorrect despite corrections having been applied.
 Interestingly getting things into CMYK needn’t be a nightmare involving recreating images into CMYK at the initial stage. Output the file from InDesign into a pdf document. Open the resultant pdf in Acrobat and go to the advanced editing tab under Tools. Select images and right click (Cntl + click in Mac) to get an editing list. Select to edit in Photoshop. Change the colour profile to CMYK and save. You can also use the slect object tool to check the properties to make sure that the image is now in CMYK.
The reason why CMYK and 100% black text is important is that black in RGB consists of 4 colours when in CMYK. This can create offset problems during the printing. Basically the text will not be as crisp as it should be as there are tiny alignment issues where the ink is put down. By ensuring that the text is 100% black (in the colour tab make sure that C, M and Y are set to 0% and the K is set to 100%) only the black ink is laid down as text. Lovely crisp text is the result. If an image is created that has text as part of the image, again make sure that this is set to 100% black, even if it looks odd in photoshop (100% black actually looks like a muddy grey when viewed on an RGB screen. Acrobat makes allowances, but Photoshop doesn’t unless you specifically set it to). Thankfully the layout artists at Hirt and Carter have been extremely patient with my bumbling as my learning curve took on the trajectory of the space shuttle.

The book is now complete and apparently good enough that it is probably going to be entered into Sappi’s annual publishing contest. This is of course helped along by the fact that the book is being printed on Sappi’s ‘Triple Green’ paper which is made entirely from recycled paper. The entire process has been an incredible journey for me. Whether it brings similar future work is obviously not guaranteed, but I have enjoyed it enough so that I hope that it will. That said, it has also been far more stressful than any other project that I have been involved with to date, particularly as demolition of the site started shortly after the shoot. Throughout all of this Marty Jasper, who coordinated the project from Standard Bank’s side and Angela Alderton from Hirt and Carter have been stalwart in their patience. I am particularly thankful to Marty and the rest of the Standard Bank team for allowing me to have almost unlimited creative freedom.For a first 'complete' book, I couldn't have chosen a better client.
No comments:
Post a Comment