

For several years HDR, or High Dynamic Range imagery, has sparked a huge amount of interest among photographers. The style came to be popular as a combination of the apparent ease of being able to merge different exposures in Photoshop along with the actual need to merge images due to the limited range of tones that a digital camera could record in a single exposure. Fast forward to 2015 and not only are digital cameras far, far more capable or recording huge amounts of tonal depth (bordering on what our eyes can see with certain cameras), but the actual style is no longer de rigour and the tastes of viewers has moved back to a more natural depiction, or at the very least representation, of the scene. Now photographers try to distinguish their work from HDR and its gaudy colours and hyper-sharpness/clarity by referring to tonal blending.
Here is an easy way to blend two exposures in Photoshop so that they depict a more natural rendition of tones than the automated software that tone maps and produces a 32-bit image for rendering as an HDR.
Step 1 - Shoot the images so that there is a good shadow point on one image and a good highlight point on the other. What this means is that one image should not be clipping in the blacks (left hand side of the histogram) while the other should not be clipping in the highlights (right hand side of the histogram) Cmd+V/Cntrl+V.
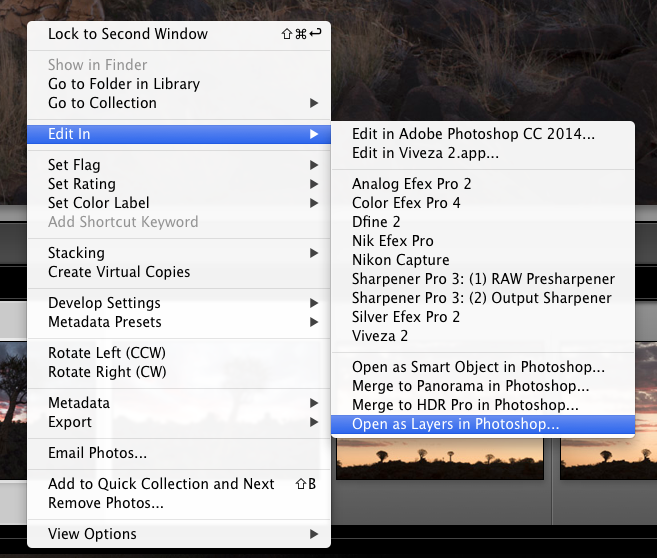
Step 2 - You’ve shot the images, now you need to blend them. Open them up in Photoshop. This is done really easily from Lightroom where you select the two images in question, right click and go to Edit In>Open as Layers in Photoshop. Alternatively open the two files separately into Photoshop. Copy the one image by selecting it (Cmd+A/Cntrl+A) copying it (Cmd+C/Cntrl+C), clicking on the second image and pasting it onto that (Cmd+V/Cntrl+V).
Step 3 - Align the images by selecting the two different layers in the Layers Palette (hold the Cmd/Cntrl button and click on the layers until they are both highlighted blue) and then going to Edit>Auto Align Layers and selecting the Auto option.
Step 4 - If there has been any movement of the camera between the frames you will have to crop out the extra pixels where there is no actual alignment. This is simply done by going to the crop tool (Shortcut ‘C’) and cropping the very edges of the picture.
Step 5 - I personally prefer working with my images so that the darkest images are at the top of the layer stack. If this isn’t the case, it is easy to select the darker layer/image and move it to the top of the layer stack by clicking and dragging the layer in the Layer Palette to the top of the Stack.
Step 6 - Now switch off the eye next to the dark layer and select the whole image (Cmd+A/Cntrl+A) and copy it (Cmd+C/Cntrl+C).
Step 7 - Now switch on the eye next to the dark (top) layer and create a mask by hitting the small square with a circle in it at the bottom of the Layers Palette. Your Layers Palette should now look like this:
Step 8 - While holding down the Alt button on the keyboard click on the mask in the Layers Palette with the mouse cursor. This opens the mask as if it were the image and the stage (where you see the picture in Photoshop) goes pure white. Now paste the image that you copied by hitting the Cmd+V/Cntrl+V buttons. A black and white version of the image that you copied will show up on the screen. This is now the mask for your tonal blend.
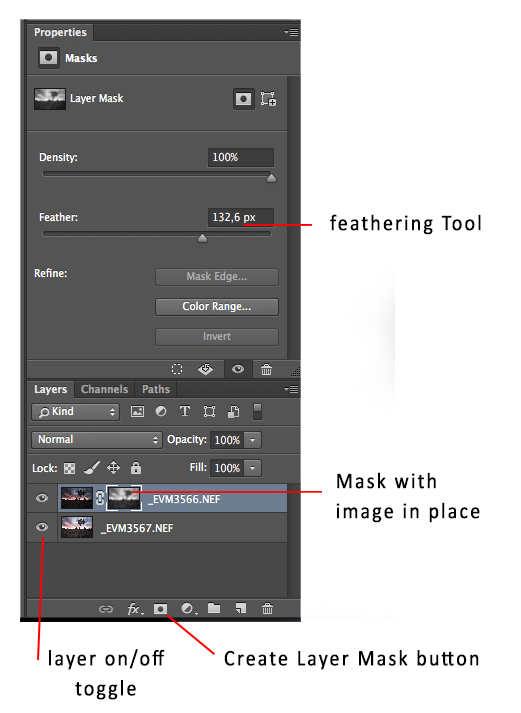
The way that the mask works is that anything that is white in the mask will show the top layer of your layer stack. Anything that is black in the mask will show the layer below the masked layer, in this case the pixels from the brighter image. Because we have used the brighter image as the basis for the mask, the brightest portions of the bright image will now be replaced by the brightest portions of the dark image.
Step 9 - Click on the top image thumbnail in the layer stack to see the effect so far. It might look a little odd at first as the transitions between light and dark tones might be too severe (a common side-effect of HDR software as well). To smooth these transitions open up the Properties panel (Window>Properties) and with the mask selected in the Layers Palette move the Feather slider over until the image looks more natural.
Step 10 - I now consider this blended image my original file. You can continue to edit the image in Photoshop, or save and move over to Lightroom to finish the editing.

No comments:
Post a Comment