
One of my favourite techniques in the images that I use is to add a sense of clarity and ‘bite’ during post-production. I, like many other photographers, use a variety of programmes to accomplish my processing workflow. One job might be done entirely in Lightroom (usually for convenience), while another will spend most of its gestation in Photoshop proper (when complexity in processing is called for) and lastly, a great deal of my imagery is also processed through Nikon’s Capture NX2 (for ultimate quality - although this is debatable).
Lightroom - Clarity Slider

One of the easiest ways to increase localised contrast in an image and give it some ‘pop’ is to simply use the clarity slider in Lightroom. Pulling the slider to the right simply increases the perceived clarity of edge areas by applying a localised contrast to those edges. Moving to the left reduces this contrast.
Used in conjunction with the Adjustment Brush (shortcut: K) it is now possible to selectively apply ‘clarity’ to specific parts of the image, or remove it - as in the case of retouching and smoothing skin.
Photoshop - Localised Contrast Enhancement with the Unsharp Mask
 The advantage of Photoshop over Lightroom is the ability to layer adjustments. Lightroom’s clarity slider can also be replicated in the Adobe Camera RAW (ACR) engine, but it is with layers PS has it’s strongest functionality.
Navigating through to the unsharp mask tool (Filter>Sharpen>Unsharp Mask) simply type in the value 25 in both the amount and radius sliders. This basically creates a strong contrast on the edges of detail within the image. As the radius is so high it doesn’t affect broad areas of similar tone (i.e. Create noise) and does a wonderful
job of adding punch to an image. Make sure to first create a duplicate layer on which to perform this contrast though. By doing this it is possible to adjust the effect by lowering the opacity of the layer and also by masking out areas where you don’t want to the localised contrast.
Capture NX 2 - High Pass Contrast
You can actually use the same principle that I’ll discuss with Capture NX2 in Photoshop, but I find it’s easier to use this technique in Nikon’s software and the former in PS.
Create a new adjustment and go to Focus>High Pass. Next select the drop down button next to opacity and change the blending mode to ‘Overlay’.
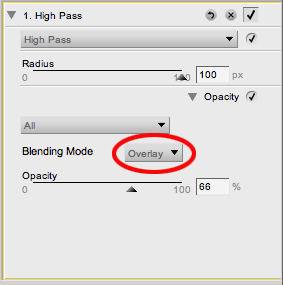 All you need to do now is play with the radius and opacity sliders to get the best effect. The beauty of this approach is that you can go from sharpening the image to creating localised contrast simply by increasing the radius.
I’ve saved the basic high pass adjustment as an adjustment preset. This means I can get the basic tool up at the press of a button. From there I only need to fiddle with the sliders to achieve my desired result.
Of course it’s possible to save a clarity preset in Lightroom and create a localised contrast enhancement action in PS (which I have done - remember to include the duplicate layer or merge layers onto a separate layer as part of the action).
No comments:
Post a Comment