
 |
| An image almost a decade ago using a a polariser and two graduated filters (and held-held) shooting into the sun. |
As landscape photographers the inclination to shoot into the sun is overwhelmingly powerful. Funnily enough I haven't heard the term we used to use and which was the
topic of many articles when we shot predominantly on film; the term
being contre-jour (shooting into the sun). This despite the fact that often the best light is in the opposite direction, or that shooting into the sun almost always leads to a nightmare exposure with an exposure value range from pure black through to burned out highlights. Still, we feel compelled to turn our lenses directly towards our galaxy’s star and photograph it as it moves from dawn to dusk through the sky. How do we get to the point where our images are actually artful as opposed to a mess of inky blacks surrounded by flare and ghosting artifacts?
Understanding The Realities of Shooting Into The Sun.
Before attempting to get exposure right while shooting into the sun, it is important to understand some of the limitations that physics and the natural world create for us. To start with the sensor (or film); only a certain range of visible light can be recorded at a time on the sensor. The range of tones that can be reproduced is what we refer to as the dynamic range of the camera. Even the very best digital cameras only achieve between 11 to 13 stops of dynamic range. This is actually extraordinarily impressive when you consider that transparency film like Fujifilm Velvia 50 only really had a dynamic range of roughly 5 stops.
As an exercise take your camera and point it at the sky during a clear sky day and note what the shutter speed value is. Then point the camera at darker foreground and make a note of that shutter speed (with all other settings remaining constant). If the sky is 1/1000th of a second and the foreground is 1 sec, you would need a dynamic range pf ten stops in order to render both without any issue. Of course this is more than achievable now, and usually there isn’t actually that much difference between the sky and the foreground. Unfortunately, when the sun is within the composition, then there is every likelihood that the range will be greater than 10 stops. So the first thing to be aware of is that the range of tones that need to be captured by the camera is potentially greater than the dynamic range of the camera’s sensor itself.
Now do the same exercise as described above, but point the camera directly at the sun. Now the shutter speed could easily get even faster. Bear in mind that the camera is trying to get a middle grey tonal average when it sets the shutter speed (assuming the camera is set to Aperture Priority). If you were to
The next thing to be aware of are the physical characteristics of the lens being used, as well as any other glass that gets put between the subject and the sensor. If you read lens reviews you’ll often come across the issue of lens flare and ghosting. Essentially what happens is that light doesn’t just refract through the glass elements of the lens, it also reflects off of them internally, scattering inside the lens barrel and causing reflections which we see as flare and ghosting. Often you can even count how many events of glass there are in a lens by how many flare spots there are. So even if you can contend with the exposure issue, you still need to be aware that often when there is a bright pinpoint light source included in the image, then flare is going to become an issue.
Solution 1 - Get The Timing (and the subject) Right
For the most part we tend to want to shoot into the sun when it is fairly low on the horizon. The good news is that this also happens to be the best time to shoot into the sun. When the sun is low on the horizon the light is essentially traveling through a thicker portion of the atmosphere (which also has a more layers of atmospheric dust). Not only does this result in a redder sun (due the wavelengths of light and how they travel through a transparent layer as well as the actual dust creating a red cast) but also reduces the actual amount of light that we see at our position vis a vis the sun.
- Dynamic Range is the range of tones from pure black to pure white that can be recorded on a sensor or film and then reproduced.
- Exposure Latitude (sometimes mistakenly referred to as Dynamic Range) is the number of stops that a film can be under or over-exposed by without losing its dynamic range.
The problem is that the when the sun is low on the horizon, the actual foreground is usually very dark, so the exposure extreme is at its maximum. This is made a little easier if we are photographing a relatively high tonal value foreground. So it’s actually easier to photograph bright desert sand or while shooting directly into the sun, than the ocean or a dark mountain (the ocean’s colour is actually a reflection of the sky, so if the sky is dark, the ocean will be too). There needs to be sufficient light in the sky to light the foreground for it not too be an inky black hole.

Another aspect that is critical for a lot of ‘into the sun’ shooting’ is to make sure that the sun partially obscured by something. This can be the edge of a mountain, branches in a tree, a cloud, or even mist. As soon as the sun is partially obscured the optical brightness of the pin-point source is massively reduced and also contributes to the creation of sun-star patterns. The vast majority of successful ‘into-the-sun’ shots actually have the sun partially blocked by something.
Solution 2 - Know Your Lens and Camera
The first thing is to work out how badly, or well, your lens performs shooting into the sun. This is fairly easy as all you need to do is take it outside and take some test shots with the sun in the frame. You can get a feel for where the the flare is going to create the most flare (if at all), as well as at what apertures it is likely to be at its most evident.
Another aspect of the lens that is worth learning about, is that as the aperture gets smaller, the length of the sun-stars potentially increases. Some lenses have very attractive star patterns that form around pin-point light sources, the sun being the most evident of these. Some lenses require you stop all the way down to the minimum aperture to achieve this effect, but others will start showing obvious star patterns even with relatively wide apertures. Usefully, the smaller the aperture the more likely you will be able to include the sun in the image. Also, you are ,more likely to be able to shoot directly into the sun with an extreme wide lens. The reason is simply that the wider the lens, the smaller the sun will appear, and therefore having less effect on the overall exposure.
In terms of the camera, it is truly astounding how far we have come with digital capture in the last few years. Use the histogram to work out what the best exposure would be for shooting into the sun. Here, the idea is to use the 'Expose To The Right Rule' rather critically; meaning that your histogram is going to have a lot of very dark shadows in the image. In post production you can then pull these shadows up. Because you have exposed for your highlights, the sun won't blow out too badly.
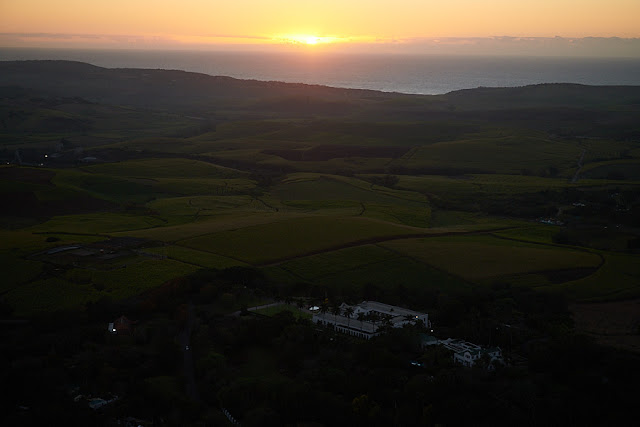
The above (and below) example is probably about as hard as it can get. Here, I was shooting an aerial image for a client from a helicopter at dawn. Forget about using filters or even doing an exposure blend, or using a tripod for that matter. The image has to be shot by hand, with a high enough shutter speed to avoid camera shake, and with an exposure to cover both the sun and the shadowy foreground. Incredibly, cameras can now do this, but you have to keep an eye on the histogram and forget about trying to use auto-exposure as it will go wrong.
Solution 3 - Use Filters
Contrary to popular belief, using filters is not a silver bullet solution to photographing into the sun. In fact, poor filter technique can exacerbate the issues of shooting into the sun. A filter is just another air/glass interface that the light has to pass through, meaning that it increases the chances of flare as a result of internal reflection.
Another issue that often comes up with the use of filters is that any dirt, dust or scratches on a filter will be become immediately obvious when shooting directly into the sun. If you are going to try shooting into the sun with a filter on your lens, then that filter (as well as the front element) has to be spotlessly clean. On top of this some square system holders create their own reflections, creating a halo of magenta when used in conjunction with an extreme wide angle lens.
Another issue that often comes up with the use of filters is that any dirt, dust or scratches on a filter will be become immediately obvious when shooting directly into the sun. If you are going to try shooting into the sun with a filter on your lens, then that filter (as well as the front element) has to be spotlessly clean. On top of this some square system holders create their own reflections, creating a halo of magenta when used in conjunction with an extreme wide angle lens.
 |
| Halo and flare caused when using a 0.9 Medium Graduated Neutral Density and pointing directly into the sun. The exposure is manageable in post-production by pulling down the highlights, but the halo ruins the shot. |
However, filters can be useful so long as you keep them spotlessly clean, and select the correct strength. I also find that the polariser can be effective when the sun is higher in the sky and you are wanting to include it in the frame. It is particularly effective when using a small aperture with the lens.
Something else that tends to surprise photographers when they go down the route of using filters to shoot directly into the sun, is the weird tonal range that results. A case in point is shooting across the Indian Ocean from the eastern seaboard of South Africa (or the Pacific from Australia and the Atlantic from the US). The sun rises directly over the flaker horizon of the ocean. In theory you should be able to shoot into the sun using a 4 Stop Hard Graduated Neutral Density filter. In the end this just results in an unnaturally dark sky with an artificially bright foreground (ugly in other words). Filter manufacturers brought out something called a Reverse Grad to combat this. This filter has a hard dark line for the horizon, but then tapers off in density as it approaches the top of the filter. The result is mean to reduce the light at the brightest point of the horizon where the sun is, but still allow the sky to maintain a natural amount of brightness above bright band where the sun is. The problem then is whenever you shoot something that has mountains, buildings, cliffs or anything else that isn’t flat along the horizon, as they are also darkened by the hard edge of the filter.
This is not to say that filters can’t work though. They do, and I use them to shoot into the sun all the time. A case in point is the image below shot on a single exposure using a Nisi 0.9 Medium Grad filter. Just use filters with an understanding of how the lens is being affected by the sun, as well as how to place the sun to get the best effect.
 |
| Another example of shooting into the sun where the use of a filter has now worked, in this case a 0.6 Hard Graduated Neutral Density on a 70-200mm telephoto lens. |
Solution 4 - The Digital Approach
Sometimes you simply have to resort to the digital approach to properly capture the sun in the frame and have it ‘look’ the way you perceive it in real life. There are a variety of techniques available in order to do this from using dedicated high dynamic range software through to simple tonal blending in a bitmap editor like Photoshop. I also include the technique I refer to as ‘giving it the finger’ (follow the link to step by step approach to this).
 |
| A blended image where multiple images were required to remove flare and balance exposure |
The goal for me is to create a realistic transition of tones while still including the sun in the composition. This means that while shooting I am pre-visualising in my mind/imagination how the final image should look. This then gives me an idea of how to shoot the image and with what techniques. I find that the best ‘into-the-sun’ images often end up being ones where I have used all four techniques together for the one shot. Complicated, but worth it.
Conclusion
Shooting into the sun is not impossible, but it is difficult and technically exacting to do right. In a talk I give when demonstrating Nisi filters I always recommend shooting with the sun just out of frame. When you do that it is relatively simple to get the exposure right while maintaining the drama of the sunlight itself. Adding the pinpoint highlight of the sun just introduces a whole new level of complexity. If you are keen on working through that complexity you can be rewarded with some spectacular images, but you need to understand that technique and patience are required in bucketloads (not to mention a little bit of serendipity and good old fashioned luck). Believe me, it is worthwhile learning how to do it right.
No comments:
Post a Comment