

If there is one tool that every digital photographer should know and understand (at least a little) it is the curves dialogue. Concurrently the most asked question I receive when teaching anything to do with post-production is, “what is the curves tool and how do I use it?” To try and simplify this then, here is a very quick and dirty explanation of the curves dialogue that will hopefully clear a path through the murk that is post-production.
Just about all editing applications have the curves dialogue, PS Elements being a notable and lamentable exception. The basic idea behind the tool is that it presents the user with a way to adjust tonal ranges in the image, set black and white points, lighten or darken the overall image, as well as adjust colour castes and hues. That’s a lot for one tool which is why it is so important.
The curves dialogue consists of a two axis graph. The lower axis represents the input values of the image’s histogram, with a values from 0 to 255. 0 represents absolute black in the image while 255 represents pure white. In Photoshop you will notice there is also a gradient bar from black to white on both the horizontal and vertical axis.

The basic idea is that the user is able to create ‘anchor points’ by clicking on the diagonal line that runs from the bottom left to the top right of the dialogue. Creating an anchor point effectively selects an input value to either shift or lock in position. The input value would correspond to the 0-255 scale of dark to light.

The vertical axis corresponds to the output value of the curves control. You can see the same gradient line with a value from 0 to 255 on this axis. If you pull up on the anchor point that you have created you essentially change the input value to a brighter value. Thus to brighten the image overall, create an anchor point in the centre of the curve and pull gently upwards. It works almost the same as if you had pulled the gamma slider to the left or right in Levels tool.
A neat trick that Photoshop CS offers is the ability to eyeball your black and white points in exactly the same way as the Levels tool. Simply hold down the ‘Alt/Option’ (PC/Mac) button while pulling the black or white point slider and the image changes to a white or black screen respectively. As pixels in the image begin to clip they appear in a different colour, thereby letting you know where your darkest and lightest zones reside in the image.
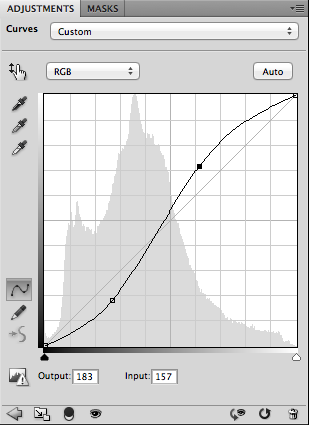 Contrast occurs when there is a difference between light and dark tones. The greater the difference, the greater the contrast. If you want to add contrast to an image it can be done by creating two anchor points on the curve, one over the darks, and one over the lights (as the illustration shows on the previous page). By pulling the darks anchor down you are essentially darkening your darks. Pulling the lights anchor point up lightens your lights. The result is a more contrasty image. The opposite movements (i.e. Pulling the anchor point down on the lights and up on the darks) will reduce hte image’s contrast.
The above movements are only the most basic of movements. Because we can set as many anchor points as we like, it is possible to affect only a small zone of tonality. It is possible to lock the whole curve except for one point by creating locked anchor points (points that we don’t move) while moving a select few to adjust only a small portion of the image’s tonal range.

Lightroom offers the same tool but without the full range of tools that Photoshop’s Curves dialogue offers. Nevertheless it allows fast and flexible tonal adjustment if you understand the basic concepts of the contrast curve. Moreover once in Photoshop the Curves tool also allows colour and hue adjustments which I hope to discuss in detail in a future Photo Writing.


No comments:
Post a Comment